Realization of a file with cutting points and full bleeds.
Whether you’re printing your leaflets, brochures or flyers, we’re finding that more and more of you are sharing files with us that don’t comply with the technical considerations that are essential for printing. Here are a few tips for using these files professionally. Here are a few tips for using these files professionally.
About full bleeds
The full bleeds indicate the illustration area outside the printing frame and outside the lines and cuttings marks. They kind of represent the margin of error to ensure that the ink is printed to the edge once cropped page.
In order to have a full bleed printing, the elements (image, anilox element or color background) need to exceed the document’s border. There should be 3 to 5 mm further apart from the final size. We also advise you to leave at least 3 to 5 mm of internal margins between the lines cut and the text is called the useful format.
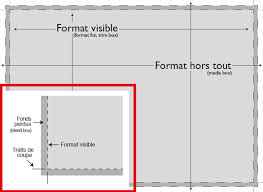
Cutting points
The printer needs cutting marks that will help him to determine where to trim the paper. It is thin horizontal and vertical lines placed in the region of full bleeds, defining the location where the page is to be trimmed.
These show to the operator where the trimming machine must cut the print paper.